Showing posts with label dessert. Show all posts

Tuesday, July 3, 2012

Hazelnut Biscotti

Have you been wondering what I've been doing these last couple of Tuesdays? 

Well.... 

A. I've been busy
B. I've been lazy
C. I forgot to bake for Tuesdays with Dorie!

I missed the month of June! How oh how did I do that? I missed making French Strawberry Cake & Oasis Naan. I still plan on making both of these recipes....I'll just be a little late. 

Fear not, I'm back in action for July! Hazelnut Biscotti was first up for the month! A lot of the bloggers in the group were chatting about their dislike for hazelnut. I thought they were nuts! I love me some Nutella (chocolate hazelnut spread). I love me a nice Hazelnut latte from La Colombe. I thought I loved hazelnut then I made these biscotti and I guess I thought wrong? I wasn't a huge fan. It was a big let down. I didn't have any hazelnut liquor on hand BUT I did have brandy (from my sangria recipe) on hand. The recipe states that brandy can substitute the hazelnut liquor. I think this was my mistake. I really tasted the brandy... a bit too much.

 (right before going in oven for the first baking)

I liked to try this recipe again and use hazelnut liquor OR use a different nut (almond or pistachio is what I'm thinking). 

 (after first baking. prior to cutting for second baking)

Even though I wasn't a fan of the recipe, I brought them into work and they went over well. So maybe it was just my taste buds? Regardless, this was my first time making biscotti and it was a fun experience that was well worth the learning! 

(Finished Product)
For the recipe visit Jodi of Homemade and Wholesome and/or Katrina of Baking and Boys.

Thanks for hosting this week! Hope everyone has a fun and save 4th of July! 

** Tuesdays with Dorie is an online baking group. We're baking our way through Baking with Julia. Visit Tuesdays with Dorie if you'd like to join in the fun! **

Friday, June 29, 2012

S'more Cookies

What screams summer more than s'mores? I'm not too sure. I don't think a summer has gone by that I haven't had s'mores. More so now in my adult life than when I was a child. I LOVE a fire pit. It's pretty much mandatory for my backyard. Perfect for spring and fall when some nights get too cold. It's also ideal for roasting marshmallows. Who roast marshmallows without going all the way and making s'mores? I'm not too sure about that either. 


I came across this recipe for s'more cookies. What fun! A nice twist on a classic summer treat. The recipe comes from the one and only, Martha. I was a little surprised that the recipe called for semisweet or bittersweet chocolate. Honestly, I only know Hershey's milk chocolate when it comes to s'mores. Since I only had semisweet chocolate on hand, I used that. I was a bit nervous about the outcome but it actually ended up working quite well.

These cookies were a hit, at home & work too. Although I learned that a lot of my coworkers don't like marshmallows. Didn't know that was possible. Aside from tasting so good, they look really cute too...at least I think they do. 

Make these for your next summer barbecue. The 4th of July is right around the corner! I promise you'll be the talk of the barbecue (in a good way for a change...I kid, I kid)!

S'more Cookies
Everyday Food July/August 2009

  • 1/2 cup old-fashioned rolled oats
  • 1 cup all-purpose flour, (spooned and leveled)
  • 1 cup whole-wheat flour (spooned and leveled)
  • 3/4 teaspoon ground cinnamon
  • 1/2 teaspoon baking soda
  • 1/2 teaspoon salt
  • 1 cup (2 sticks) unsalted butter, room temperature
  • 3/4 cup light-brown sugar
  • 1 large egg
  • 8 ounces bittersweet or semisweet chocolate, cut into 30 squares
  • 15 large marshmallows, halved horizontally
Preheat oven to 350 degrees. In a food processor, pulse oats until finely ground. Add flours, cinnamon, baking soda, and salt; pulse to combine. In a large bowl, using an electric mixer, beat butter and sugar until light and fluffy. Beat in egg, scraping down side of bowl. With mixer on low, beat in flour mixture just until combined.

Drop dough by tablespoons, 1 inch apart, onto two baking sheets. Top each with a chocolate square. Bake just until lightly golden, 11 to 13 minutes, rotating sheets halfway through. Remove sheets from oven; heat broiler. Top each cookie with a marshmallow. One sheet at a time, broil until marshmallows are lightly browned, 1 to 1 1/2 minutes. Transfer cookies to wire racks to cool.

Wednesday, May 30, 2012

Sour Cream Cookies


I was recently watching an episode of The Martha Stewart Show, she and her guest were making these sour cream cookies that came together really quickly. I know here staff has everything already measured out and whatnot but these really were easy to throw together. I had sour cream on hand and needed to use it up. A perfect excuse to make cookies! 

 
Sour Cream Cookies
The Martha Stewart Show
 
1/3 cup unsalted butter, plus more for baking sheet
1 1/2 cups all-purpose flour, plus more for work surface
1/2 teaspoon baking powder
1/4 teaspoon baking soda
1/4 teaspoon salt
1 cup sugar
1 large egg
1/3 cup sour cream
1/4 teaspoon pure vanilla extract (optional)
Sanding sugar, for sprinkling
 
 Preheat oven to 375 degrees. Butter a baking sheet and set aside.
In a medium bowl, whisk together flour, baking powder, baking soda, and salt; set aside.
In the bowl of an electric mixer fitted with the paddle attachment, cream together sugar and butter. Add egg, sour cream, and vanilla, and mix until well combined. With the mixer on low, gradually add enough of the flour mixture to form a soft dough. You may have up to 1/2 cup flour mixture remaining. Transfer dough to refrigerator until chilled.
Place heaping teaspoons dough on baking sheet and sprinkle with sanding sugar. Transfer to oven and bake until light golden, 8 to 10 minutes.

Wednesday, May 9, 2012

Banana Ice Cream

 I've mentioned before I'm not a banana person. I really wish I was. Every now and again, I'll be brave and try something banana. I just can't get myself to like the flavor. Let's keep hoping that will change in the near future. Until then, I'll continue to make banana breads, cakes, and now ice cream for those who love bananas! It's actually somewhat genius to bake things in a flavor you don't like when you're trying to lose some weight but I digress.... 

 Back to the ice cream. Since there's only one person in the house who eats bananas, I have a freezer full of ripe ones. I usually make a bread, bundt cake, etc but this time I wanted to step things up a bit and make banana ice cream! That's right homemade banana ice cream! So I turned to Alton Brown for a recipe that got 5 stars and all positive reviews. It was a crowd- pleaser, just ask my coworkers! Luckily for them, Nadya found it to be too tasty that she wanted it out of the house so she didn't eat it all! I guess it's that good! If you're a banana lover, I think this is just for you! 

Banana Ice Cream from Alton Brown

6 (approximately 2 1/4 pounds) ripe bananas
1 tablespoon fresh squeezed lemon juice
3/4 cup light corn syrup
1 vanilla bean, scraped
1 1/2 cups heavy cream
Place bananas in freezer and freeze overnight. Remove bananas from freezer and allow to thaw for 45 minutes to 1 hour. Peel bananas and place in bowl of food processor along with the lemon juice. Process for 10 to 15 seconds. Add corn syrup and vanilla bean seeds and turn processor on. Slowly pour in the heavy cream. Process until smooth. Chill mixture in refrigerator until it reaches 40 degrees. Transfer mixture to an ice cream maker and process according to manufacturer's instructions. Place mixture in an airtight container and freeze for 3 to 6 hours before serving.

Friday, May 4, 2012

Guest Post: Apple Rhubarb Pie

When Lynn asked me to guest blog, I was beyond ecstatic. I mean, it really was a culmination of life events for me. Lynn is just the coolest and the fact that she asked me to guest blog on her cooking blog means more to me than she can ever imagine.

A little about me, the best-guest-blogger-ever (sorry Sara):
My name is Melissa and I am a real housewife of the suburbs of Philadelphia. With my busy schedule of working and doing tireless tasks such as grocery shopping and getting the mail from the mailbox, I like to make a little magic happen... in the kitchen that is! I recently have been obsessive been trying to get rhubarb, even though it is barely in season (I was trying to seriously wow my future parent in-laws with my awesome baking skills over Easter with a serious rhubarb recipe, but much to my chagrin, none was available! Oh the injustice of life! So we got the next best thing.. an iced vanilla cake in the shape of a bunny that could have sent a diabetic to their grave. But the rhubarb has been a burning desire that I just could not squash. Thus, when Lynnie decided to ask me (ME!!!!) to guest blog, I knew what I had to make! So, all you need to know about me is that I am the best!

BUT, I end this little blurb about the best-guest-blogger-ever with a challenge: Paul, my betrothed, can literally do nothing right, not even load the dishwasher correctly, EXCEPT, he makes the best pizza dough this side of Italy. I say for a bit of fun and good natured fun, Paul and Lynn have a dough-off in Lynn's test kitchen. We make the pizza and a blind taste test will ensue. What do you say there Lynn? Are you chef enough?

YELC (Your Even Loving Chef),
Melissa
 
 
Apple Rhubarb Pie: 
This recipe was  borrowed from Cooking Light Magazine, April 2012 issue.
 
Hands on time: about 40 minutes
Baking time: 1 hour and 15 minutes

Ingredients:
1 pre-made pie crust (such as Pillsbury)
Cooking Spray
3 1/2 cups sliced rhubarb
1 cup granulated Sugar
1 tablespoon lemon juice
2 Granny Smith apples, peeled, cored and sliced
1/2 teaspoon cinnamon
3/8 teaspoon salt, divided
1 cup all purpose flour, divided
1/2 cup brown sugar
6 tablespoons cold butter, cut into small pieces
1/3 cup chopped walnuts

Method:
Preheat the oven to 425 degrees.
Place pie dough on a lightly floured surface; fit to a 9" pie plate.
Spray your pie plate liberally with cooking spray.
Place the pre-made pie dough into the pie plate. Make sure there is enough 'overhang' so you can flute ( I don't know what 'flute' means, so I folded, into what I thought, was decorative).

Combine rhubarb, granulated sugar, lemon juice and apples; toss.
 
 
Sprinkle the mixture with cinnamon, 1/4 teaspoon of salt, and 3 tablespoons of flour; toss.
Spoon (I used a slotted spoon since it was super runny) the mixture into the pie plate with prepared crust.

Set the prepared pie aside.


Level 3/4 cup of flour in a medium bowl. Add 1/8 teaspoon salt, brown sugar, and cut up 6 tablespoons of butter and mix (the recipe calls for the use of a pastry blender- whatever that is). I used two knives in a fashion to 'cut' the butter, like one would cut meat. Do this until the mixture resembles a mealy texture, or until your arms get tired (which seriously happened).
 

Stir in the walnuts (Baker's note: chopped walnuts were a full two dollars more, for less. So being the genius that I am, I purchased the larger, whole walnut, measured out 1/3 cap, placed them in a sandwich bag, placed the bag level on a tea towel and beat the pieces into chopped with my french rolling pin.)

Sprinkle the butter/flour/walnut mixture over top of the entire pie. Make sure that you fill in all the crevices with the mixture.


Bake in the pre-set oven for 15 minutes.

Reduce the heat of the oven to 375 degrees and bake the pie for an additional 30 minutes or until golden brown. I had to bake mine for about 50 minutes, but I have an electric oven. if the crust seems to be browning, you can place some foil around the edges of the pie to protect it from burning.
 

Let the pie stand at least 15 minutes before serving.
Enjoy!

Thursday, May 3, 2012

Frosted Sugar Cookies

We've all passed these cake-like cookies in the grocery store. Some of us might have a hard time walking by them. They're large, soft, frosted perfectly, & topped with the perfect amount of sprinkles. Nadya stumbled upon a picture of these cookies while browsing the 'nets the other day. Since she saw them, she couldn't stop talking about how badly she wanted soft frosted sugar cookies. She mentioned her craving enough that I finally stepped up and made them! I'm happy I did! I found a winning recipe!


To make the cookies, preheat the oven to 350˚ F.  Line baking sheets with parchment paper or silicone baking mats.  In a medium bowl combine the flour, baking powder and salt, and whisk together to blend.  In the bowl of an electric mixer, combine the butter and sugar and beat together on medium-high speed until soft and fluffy, about 2-3 minutes.  Beat in the eggs one at a time, mixing well after each addition and scraping down the bowl as needed.  Blend in the vanilla.  With the mixer on low speed, add in the dry ingredients mixing just until incorporated and evenly mixed.  Cover and chill the dough for 1 hour.

When you are ready to bake the cookies, scoop a scant quarter cup of dough and roll into a ball.  Flatten the ball slightly and place on the prepared baking sheet.  Repeat with the remaining dough, spacing the cookies at least 2-3 inches apart.  Bake about 10-12 minutes or just until set.  (Do not overbake!  The edges should be no more than very lightly browned if at all.)  Let cool on the baking sheet for several minutes.  Transfer to a wire rack to cool completely.

To frost the cookies, place the confectioners’ sugar in a medium bowl.  Add the melted butter, vanilla, and milk to the bowl and whisk until smooth.  Whisk in additional milk as necessary, 1 teaspoon at a time, until you reach your desired consistency.  Tint with food coloring if desired.  Use an offset spatula or spoon to frost the cooled cookies.  (If the frosting begins to thicken as you decorate, just continue to whisk in small amounts of milk to keep it workable.)  Top with sprinkles if desired.  Store in an airtight container.

Tuesday, May 1, 2012

Hungarian Shortbread with Rhubarb Jam

I've been curious about rhubarb for quite sometime. I've also been intimidated by it. I only learned about rhubarb a few years ago. I usually see it paired with strawberries over ice cream or in a pie. Every year when it's in season I tell myself that I'm going to buy it and make something with it and then I usually don't BUT this year I did (thanks to Tuesdays with Dorie/Baking with Julia)! This week's recipe for Hungarian shortbread called for rhubarb jam but don't worry if you're not a rhubarb fan or if you're having trouble finding it (there seems to be a shortage this year) you can use your favorite preserves. I'm thinking Nutella might even be a good edition for the next batch I make.

 (Making the rhubarb jam)

Believe it or not this was my first time making shortbread. This was a very unique way to make it too! Once you make the dough, you freeze it until firm and then grate the dough with a cheese grater. While I was grating away, I kept thinking about my friend, Sara, who has a horrible fear of cheese graters! 

 
(Right out of the oven) 

The shortbread and the rhubarb jam came together very nicely. Some other bloggers were having trouble with the bottom layer baking all the way through, luckily I didn't run into that problem.  The tartness of the rhubarb jam paired so nicely with the sweetness of the shortbread. All in all, I think this recipe turned out to be a success! 

(The finished product)
Thanks to Lynette of 1SmallKitchen  & Cher of The Not So Exciting Adventures of a Dabbler for hosting this week! Visit their blogs for the Hungarian Shortbread recipe! 


** Tuesdays with Dorie is an online baking group. We're baking our way through Baking with Julia. Visit Tuesdays with Dorie if you'd like to join in the fun! **

Tuesday, April 17, 2012

Lemon Loaf

Last Sunday was Easter. Last Saturday our local bar was giving away opening day Phillies tickets.....

I hosted a nice little Easter brunch for our two close friends, Melissa and Jack. I prepared as much as I could on Saturday so it would be easy breezy on Sunday morning. The lemon loaf from this week's Tuesday with Dorie made it to my Easter menu. I thought it was a perfect complement to the overall meal. It was really easy to put together. The hardest part was probably zesting the lemons and of course waiting for the loaf to bake. Waiting wasn't hard for me...but it was hard for somebody else (somebody who thought they were going to win Phillies tickets)! That certain someone (cough, cough, Nadya) pulled the loaf out of the oven about 8 minutes too soon. Unfortunately, I didn't notice until Easter morning when the center of the loaf looked rather moist. I tried to save it by heating it back up but that didn't help. I'll have to make the lemon loaf again. The pictures from all the other bloggers look amazing! If I had more lemons on my hand Easter morning I would have started all over. I'll be sure to blog about my lemon loaf success. Until then, check out my fellow Tuesday with Dorie Bloggers and their lemon loaves. 

Lemon loaf failure, topped with glaze

For those of you wondering, we did NOT win the opening day Phillies tickets but we did have a fun time. 


Thanks so much to Truc of Treats and Michelle of The Beauty of Life for hosting this week! I'll be sure to make again soon! You can find the recipe here

Monday, July 18, 2011

Blondies with Chocolate Chips


I had full intentions of bringing these blondies to my cousin's graduation party; however, after sampling one they slowly started to disappear. They're dangerous to keep around. 
(Sorry they never made it to your party, Aunt T! )

Believe it or not, this was my first time making blondies. I haven't had a good past with  brownies (I'm determined to change that) so I assumed I wouldn't be good at making blondies. Boy was I wrong!  Martha (yes, we're on a first name basis) sends me daily emails with the cookie of the day recipe. I usually get the email while I'm at work and spend about 2 minutes drooling over whatever the day's recipe is before I file it away in the 'cookies to make' folder in my email. There are a lot of cookie recipes filed away. I better start crossing some off my list, especially if they're all as good as these were. 

Blondies are a cookie cake like goodness. The recipe called for walnuts which surprisingly I didn't have on hand so I omitted them. Walnuts or pecans would add a lovely flavor. I'll be sure to add them next time. If you're planning on bringing these to a party, keep in mind this recipe only yields 16. You might want to make 2 batches.

Blondies with Chocolate Chips

  • 8 tablespoons (1 stick) unsalted butter, melted, plus more for pan
  • 1/2 cup packed light-brown sugar
  • 1/3 cup granulated sugar
  • 1 large egg
  • 1 teaspoon pure vanilla extract
  • 1 cup all-purpose flour, (spooned and leveled)
  • 1 teaspoon salt
  • 1 cup semisweet chocolate chips
  1. Preheat oven to 350 degrees. Brush an 8-inch square baking pan with butter; line pan with a piece of parchment paper, leaving a 2-inch overhang on two sides. Butter paper.
  2. In a large bowl, whisk butter and sugars until smooth. Whisk in egg and vanilla. Add flour and salt; mix just until moistened (do not overmix). Fold in 1/2 cup each chocolate chips and walnuts. Transfer batter to prepared pan; smooth top. Sprinkle with remaining chocolate chips and walnuts.
  3. Bake until top is golden brown and a toothpick inserted into the center comes out clean, 40 to 45 minutes. Set pan on a wire rack, and let cool completely. Using parchment overhang, lift cake from pan and transfer to a cutting board; cut into 16 squares.

Monday, April 4, 2011

What a Week!

Happy April Lots to Ladlers! 

There has been a lot going on! This past week was a busy one...busy in a good way! Nadya and I spent Sunday-Wednesday in Key West, FL. Our first time there! It was absolutely lovely!!! Perfect weather, perfect drinks, perfect food. 
And yes, I had key lime pie. It was my first taste of key lime pie, ever. Since it was my first time, I had to make sure it came from the best place in Key West. After a Google search and surveying the locals, it was determined that we were off to Kermit's Key West Key Lime Shoppe.
Kermit's is really cute. They have key lime everything! You name it, they have it....key lime guacamole, key lime fudge, key lime popcorn, etc. I was there for the key lime pie but did get a sample of the key lime fudge which was mighty good! 

Here's a slice of pie. Looks like a cheesecake doesn't it? I liked the pie more and more as each bite went on. It was light and airy yet filling with a nice citrus bite. It had a great graham cracker crust and whipped cream topping that complimented the filling greatly.

Now if you can get your hands on some key limes you can make this pie yourself! Kermit's was featured on The Food Network and so was the key lime pie recipe. 

Kermit's Key Lime Pie:

  • 1 (14-ounce) can sweetened condensed milk
  • 3 egg yolks
  • 1/4 cup key lime juice
  • 1 (9-inch) graham cracker pie crust
  • Whipped cream, to garnish
Preheat oven to 300 degrees F.
In a mixer on low-medium speed, blend the milk and egg yolks at low speed until smooth. Add the key lime juice and finish blending.
Gently pour the mixture into the pie crust and bake for 15 minutes. Remove the pie from the oven and let cool for another 15 minutes before refrigerating.
Refrigerate for 1 to 2 hours before serving. Serve cold and top with fresh whipped cream. 


In other news, I'm an aunt! I told you it was a busy week. Jake (that cutie below...no, not me, the other cutie) was born Wednesday, 3/30 and instantly stole the hearts of everyone in my family! So happy he's finally here! xoxo!

Tuesday, March 8, 2011

Banana Bundt Cake

Hello Lots to Ladlers! Sorry for the lack of posts these days. Let's blame it on my sister, Katie! She's consuming a lot of my time. I'm currently planning her baby shower with my mom! It's taking up a lot of my time but at least I got a glue gun out of the deal. Can you believe I didn't own a glue gun until this year? Shocking, right?!?

Now back to the banana Bundt, after all that's what this post is about. I always joke with Nadya that she purposefully leaves bananas on the counter to get too ripe so I'll have to make her banana bread. (NOTE: I don't like bananas so I can't help to eat them up before they're too ripe.) I guess I'm buying too many bananas for one person to eat. I often end up making banana bread but decided to make this banana Bundt this time.

I came across the recipe on a food blog that I often read called The Food Librarian; however, the recipe is from Dorie Greenspan. As I mentioned earlier, I don't eat bananas ( I know, I know that's bananas!) so I can't really tell you how good or bad this was BUT I can tell you that everyone who ate it loved it. I can also tell you that it was super easy to make. So if you're a fan a bananas, go bananas and make this Bundt!!

Classic Banana Bundt Cake
Baking: From My Home to Yours.

Ingredients: Makes 1 Bundt Cake (14 servings)

3 cups all-purpose flour
2 teaspoons baking soda
1/2 teaspoon salt
2 sticks (8 ounces) unsalted butter, at room temperature
2 cups sugar
2 teaspoons pure vanilla extract
2 large eggs, preferably at room temperature
About 4 very ripe bananas, mashed (you should have 1 1/2 - 1 3/4 cups)
1 cup sour cream or plain yogurt (I used Stonyfield vanilla yogurt)

Center a rack in the oven and preheat to 350 degrees F. Generously butter a 9- to 10-inch (12 cup) Bundt pan. (If you use a silicone Bundt pan there’s no need to butter it.) Don’t place the pan on a baking sheet - you want the oven’s heat to circulate through the Bundt’s inner tube.

Whisk the flour, baking soda and salt together.

Working with a stand mixer, preferably fitted with a paddle attachment, or with a hand mixer in a large bowl, beat the butter until creamy. Add the sugar and beat at medium speed until pale and fluffy. Beat in the vanilla, then add the eggs one at a time, beating for about 1 minute after each egg goes in. Reduce the mixer speed to low and mix in the bananas. Finally, mix in half the dry ingredients (don’t be disturbed when the batter curdles), all the sour cream and then the rest of the flour mixture. Scrape the batter into the pan, rap the pan on the counter to debubble the batter and smooth the top.

Bake for 65 to 75 minutes, or until a thin knife inserted deep into the center of the cake comes out clean. Check the cake after about 30 minutes - if it is browning too quickly, cover it loosely with a foil tent. Transfer the cake to a rack and cool for 10 minutes before unmolding onto the rack to cool to room temperature.

If you've got the time, wrap the cooled cake in plastic and allow it to sit on the counter overnight before serving - it's better the next day.

Optional Lemony White Icing:
Sift 3/4 cup confectioners' sugar into a bowl and squeeze in enough fresh lemon juice (start with 2 teaspoons and add more by drops) to make an icing thin enough to drizzle down the Bundt's curves.

Monday, February 21, 2011

Peanut Butter Icing

Are you mad at me? Are you sick of looking at the oatmeal chocolate chip cookies? Forgive me please for leaving you guys in the dark for so long! I really have no excuse!

I'll find my way back into your hearts with this super sweet treat! I just know I will! 

Nadya has been recovering...(Hey, that's my excuse for leaving you in the dark! I've been busy nursing her back to health.) Anyway, while she's been recovering she has had quite the sweet tooth. This girl wants cookies, ice cream, chocolate, etc. 

Her favorite treat these days just happens to be a chocolate cupcake with peanut butter icing. A great combination. There are tons of cupcake boutiques in the city and just about all of them offer this flavor. Some even use peanut butter alone for the icing. I'm on a mission to find the right peanut butter icing, my friends! I'm sorry to report this is not the one. (tears.) The flavor was just not working for me (nor was it working for the patient). I thought the cream cheese was too strong. Nadya really thought the little bit of salt ruined the flavor. Try it yourself or give me a better recipe! 

This might be the only time Martha has let me down. I'll be back with another recipe. I'll keep you posted.

Peanut Butter Frosting:
6 ounces cream cheese
1/3 cup confectioners' sugar
1/2 teaspoon salt
1 cup creamy peanut butter (not natural)
1/2 teaspoon pure vanilla extract
1/2 cup heavy cream 

Beat cream cheese and confectioners' sugar with a mixer on medium speed. Add salt, then peanut butter, then vanilla. Whisk cream until soft peaks form, and then fold into peanut butter mixture. Use immediately, or cover and refrigerate for up to 2 days. (Bring to room temperature, and beat on low speed until smooth before using.)

Thursday, January 27, 2011

Oatmeal Chocolate Chip Cookies

two words: snow day! 

Yes, there was 14.9" of snow this morning when I woke up and looked out my window. No, I was not going to deal with SEPTA to make it in to work. So what did I do with my day off?? Lots! One of the things I did today was make these easy (I mean easy) oatmeal chocolate chip cookies. Yum!

I was flipping through the January/February Issue of Food Network Magazine and came across this recipe. The recipe called for raisins since I really don't like raisins I substituted chocolate chips for them! Which makes a great combination!! 

I promise you these cookies are easy! I started to make them at 2pm and had them on the table ready to eat by 2:45! That's quick, right?
Oatmeal Cookies:

1 1/4 cup brown sugar
1 egg 
2 egg white
1/4 cup vegetable oil
1 1/2 cup rolled oats
1 cup whole wheat flour
1/2 cup wheat germ
1 teaspoon baking soda
1 teaspoon salt

1/2 cup raisin, chocolate chunks, walnuts or a combination of all (I only used chocolate)

Whisk brown sugar and eggs in a bowl. Whisk in vegetable oil. Stir in rolled oats, whole wheat flour, wheat germ, baking soda, salt. Add raisins, chocolate chunks and walnuts. Drop large spoonfuls onto lined baking sheets and gently flatten ( I used the bottom of a glass which worked great). Bake at 350 for 12-15 minutes.

Did I mention they're easy to make? 

Monday, December 20, 2010

Oreo Truffle Goodness

When I tell you this is one of the easiest desserts I really mean it. This is a Popil family favorite, actually it's a lot of people's favorite. However, when I think of this treat, there really is only one person I think of...LIZ, my cousin, friend, college roommate, etc. who LOVES Oreos! She sorta has a problem with Oreos but we love her for it!

This recipe yields about 40 truffles but you're better off doubling the recipe since it won't take long for those 40 truffles to disappear! The Oreo balls are good on their own but even better when dipped in chocolate (my opinion, of course). Try them both ways. I used milk chocolate but dark chocolate and white chocolate would work nicely too. 

I'm pretty sure Santa will leave an extra nice gift, if you're kind enough to leave him some!

1 pkg. (8 oz.) Cream Cheese, softened
1 pkg.  (1 lb. 2 oz.) OREO Cookies, finely crushed
2 pkg. (8 squares each) Semi-Sweet Chocolate, melted 

Crush Oreos in food processor (if you don't have a food processor a Ziploc back with a rolling pin works just as well). Mix in cream cheese. Roll into 1 inch balls. Refrigerate for 30 minutes. Melt chocolate in a double boiler or microwave...roll balls in melted chocolate and let cool on wax paper. Keep refrigerated.

Friday, December 3, 2010

Peppermint Bark

I'm not a huge fan of white chocolate and I'm not a huge fan of peppermint...so you might be asking yourself... "why in the world did Lynn make peppermint bark?" Well I'll tell you why...1.) Remember I'm trying to make 10 different holiday goodies?? I can't only make cookies! 2.) It's very festive and 3.) because I wanted to. Those are good enough reasons, right?

A lot of you probably have a holiday party to attend or you're throwing one yourself. Peppermint bark is a good snack to bring or serve! It can also make a great gift in a pretty little holiday tin! It's really easy and you can make as much or as little as you'd like.


I chose this recipe from Joy of Baking since it also uses semi sweet chocolate along with white chocolate. I know I said I'm not a fan of white chocolate or peppermint but I actually ended up liking this! Try it, you'll like it!

6 ounces (170 grams) semi sweet chocolate, coarsely chopped
2 teaspoons vegetable oil
6 ounces (170 grams) white chocolate, coarsely chopped
1/3 - 1/2 cup (50 - 80 grams) crushed candy canes

Line the bottom and sides of an 8 inch (20 cm) square baking pan with aluminum foil, smoothing out any wrinkles. Melt the semi sweet chocolate and 1 teaspoon of vegetable oil in a heatproof bowl placed over a saucepan of simmering water. Immediately pour the melted chocolate into the prepared pan and tilt the pan so the chocolate makes an even layer. Place in the refrigerator for about 30 minutes, or until the chocolate has set.
Then, melt the white chocolate and remaining 1 teaspoon of vegetable oil in a heatproof bowl placed over a saucepan of simmering water. Immediately pour the melted white chocolate over the dark chocolate and tilt the pan so the chocolate is in an even layer. Sprinkle the crushed candy canes evenly over the white chocolate. Place in the refrigerator for about 30 minutes, or until the chocolate has set.
Remove the Peppermint Bark from the pan by lifting the edges of the aluminum foil. Peel back the foil and break the bark into small irregular pieces. Store in an airtight container in the refrigerator for up to two weeks.
        

Wednesday, November 10, 2010

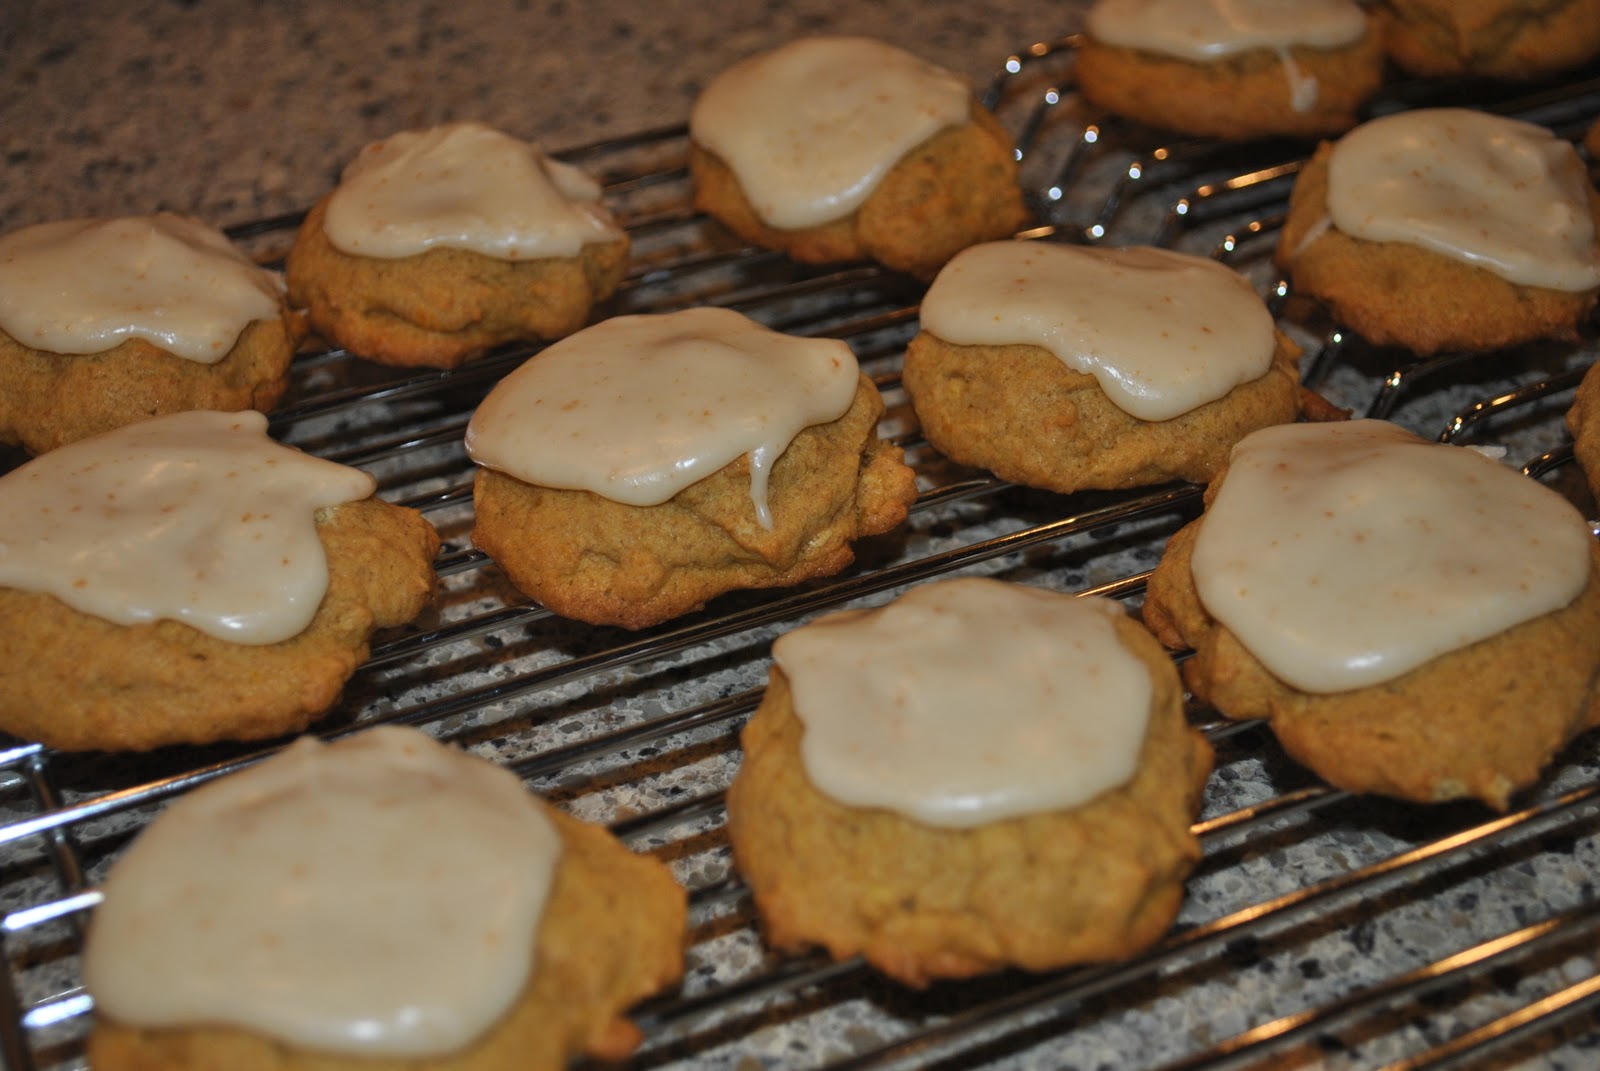
Pumpkin Cookies...I promise you can't just have one!

I warned you I was getting plenty of use out of that new mixer! (thanks again, mom & dad!) Here is one of the many sweets I made since I got the mixer. Let me just start off by telling you how much I love the fall! I'm sure you've heard it from me before but seriously, it's by far the best season out there. The flavors, the colors, the weather, the clothes....OK you get what I'm saying now back to the cookies. 

These cookies are more like pumpkin cake bites. I've made pumpkin cookies before, yep even blogged about them, but these aren't even comparable to them. I promise if you like pumpkin you'll love these cookies!
I used the following recipe for the cookies but used whole wheat flour instead of all purpose. I used Martha's brown butter icing recipe which is a perfect match for these cookies! 

For the Cookies: 
Ingredients:   
1 cup unsalted butter
1 cup sugar
1 cup cooked, pureed pumpkin (fresh or canned)
1 egg
1 teaspoon pure vanilla extract
2 cups unbleached all purpose flour ( I used 1 cup all purpose / 1 cup whole wheat)
1 teaspoon baking powder
1/2 teaspoon baking soda
1/2 teaspoon salt
1 teaspoon cinnamon
1/2 teaspoon freshly grated nutmeg 

Directions:
Preheat oven to 350 degrees. Cream butter and sugar until fluffy. Add pumpkin, egg and vanilla and mix well. Combine flour, baking powder, baking soda, salt, cinnamon and nutmeg. Stir into butter mixture until well blended. Drop by teaspoonful onto parchment covered baking sheet, about 2 inches apart. Bake about 15 minutes, or until golden. Cool. 

For the Icing:  
( I cut the recipe in half. This amount is enough for 6 dozen)
Ingredients:
4 cups confectioners' sugar, sifted 
10 tablespoons (1 1/4 sticks) unsalted butter 
1/4 cup plus 1 tablespoon evaporated milk
2 teaspoons pure vanilla extract

Directions:
Put confectioners' sugar in a large bowl; set aside. Melt butter in a small saucepan over medium heat. Cook, swirling pan occasionally, until golden brown, about 3 minutes. Immediately add butter to confectioners' sugar, scraping any browned bits from sides and bottom of pan. Add evaporated milk and vanilla; stir until smooth. Spread about 1 teaspoon icing onto each cookie. If icing stiffens, stir in more evaporated milk, a little at a time.