Thursday, December 30, 2010

I scream...You Scream...We all scream for ICE CREAM


When I was in high school I had the best job EVER...I scooped ice cream at Manning Farm & Dairy, a small family owned business close to home. Still to this day, I say it was my favorite job. So you can imagine how excited I was when I opened up a KitchenAid ice cream maker attachment on Christmas day! I was overjoyed! I am so excited to have this and I know I'm going to get plenty of use out of it. I know that my days of working at the ice cream shop are going to help me come up with some creative flavors! I can't wait to share some of them with you! I know I won't be buying ice cream any more!!

To break the new attachment in, I decided to make a classic flavor...French vanilla! It was so easy and SO delicious! I'll be sharing the recipe with you later in the week. I'm having a hard time deciding what flavor I'll be making next! 

Thanks, grandma, for this awesome gift for the kitchen! I'll be sure to bring  you some of your favorite butter pecan next time I visit!

Holidays

Hope everyone had a fantastic holiday! I surely did! I really can't believe that 2010 is coming to an end. Usually I get a little sad that time has passed so quickly but I'm ready for 2011. I really feel like it's going to be a great year! Before I reflect on 2010 and let you know my cooking goals for 2011 I want to give you a Christmas summary. 

My family has an awesome tradition that dates back to my great great grandmother. Every year my family gets together and makes homemade ravioli for Christmas Eve. I'm usually too busy to travel up to my parents now a days but I remember growing up and making them with my grandmother and great aunts. I think it's awesome that this tradition has been around so long ( I guess that's why they call it a tradition??)! Thanks Aunt Theresa, Mom, Peggy, Aunt Melissa, & Aunt Terri for the delicious ravioli this year!

Here's a couple more pictures from Christmas Eve at Aunt T's! 


Wednesday, December 22, 2010

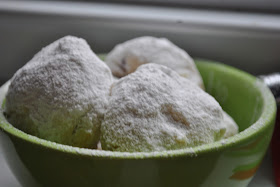
Pecan Snowballs


Another recipe to use up those pecans I have on hand (Thx, Melissa!)! 

I get well over 100 emails a days (and that's just to my personal account)...a lot of the emails I receive are daily recipe/food related emails. Trust me I love getting them because it really does give me last minute dinner ideas and a whole lot of inspiration! This recipe came to me from a  Real Simple "Christmas Cookie Count Down" email blast. I thought to myself, "How perfect, a recipe that got great reviews and uses pecans!" I have to admit, I read the recipe over and over because I found it really funny/strange that the recipe calls for no eggs! Perfect for people with an egg allergy, right? These pecan snowballs are really tasty and go great with a cup of coffee or tea! I have a feeling Santa would like them too! If you're not a fan of confectioners' sugar (but really who isn't?), the cookies taste really good without! 

1  cup  pecans 
1  cup  (2 sticks) unsalted butter, at room temperature 
1 3/4  cups  confectioners' sugar 
1/2  teaspoon  pure vanilla extract 
1/2  teaspoon  pure almond extract 
1/4  teaspoon  kosher salt 
2  cups  all-purpose flour

Heat oven to 350° F. Spread the pecans on a rimmed baking sheet and toast for 8 minutes. Let cool and roughly chop.
With an electric mixer, beat the butter and 1 cup of the sugar until fluffy. Mix in the vanilla and almond extracts and salt. Gradually add the flour, mixing until just incorporated. Mix in the pecans. Shape the dough into tablespoon-size balls and place on a parchment-lined baking sheet. Refrigerate for 30 minutes.
Transfer half the balls to a second parchment-lined baking sheet, spacing them 1 1/2 inches apart. Bake until lightly golden, 18 to 22 minutes. Let cool on the baking sheets for 10 minutes.
Place 1/2 cup of the sugar in a large bowl. Toss the warm cookies in the sugar and return to the baking sheet. Sift the remaining 1/4 cup of sugar over the cookies before serving.

Monday, December 20, 2010

My thoughts on eggnog...

December is coming to an end. I really can't believe how fast this year has gone by. Remember my December to-do list? I'm still checking things off that list. All that's left are some more baked goods! 

(I was mid-sentence in this picture)

3. Try Eggnog
I'm thinking about making it...I don't know though I just get so scared with the idea of drinking raw eggs.  Call me crazy but I really want to like eggnog. In order to like it I have to try it.

This past weekend, Melissa had a nice holiday party at her house. A perfect setting for me to try eggnog. I'm not going to lie, I was nervous. I'm not a huge fan of milk. I'm not the type of girl to drink a glass of milk. I like it on my cereal and that's about it. Nonetheless, I was scared. 

So I toasted to my first eggnog experience. Well...I guess it could technically be my last eggnog experience! I like the spice flavor but the consistency is just too hard for me to swallow! I can't imagine drinking a whole glass of it. Aunt T, how do you do it?? Maybe my feelings will change next year? 
 
Thanks for a great party, Melissa! Here's a picture of us girls and our grandma (sitting)! 

Oreo Truffle Goodness

When I tell you this is one of the easiest desserts I really mean it. This is a Popil family favorite, actually it's a lot of people's favorite. However, when I think of this treat, there really is only one person I think of...LIZ, my cousin, friend, college roommate, etc. who LOVES Oreos! She sorta has a problem with Oreos but we love her for it!

This recipe yields about 40 truffles but you're better off doubling the recipe since it won't take long for those 40 truffles to disappear! The Oreo balls are good on their own but even better when dipped in chocolate (my opinion, of course). Try them both ways. I used milk chocolate but dark chocolate and white chocolate would work nicely too. 

I'm pretty sure Santa will leave an extra nice gift, if you're kind enough to leave him some!

1 pkg. (8 oz.) Cream Cheese, softened
1 pkg.  (1 lb. 2 oz.) OREO Cookies, finely crushed
2 pkg. (8 squares each) Semi-Sweet Chocolate, melted 

Crush Oreos in food processor (if you don't have a food processor a Ziploc back with a rolling pin works just as well). Mix in cream cheese. Roll into 1 inch balls. Refrigerate for 30 minutes. Melt chocolate in a double boiler or microwave...roll balls in melted chocolate and let cool on wax paper. Keep refrigerated.

Monday, December 13, 2010

Maple Pecan Muffins

I'm using up those pecans! 

I wanted to make some sort of breakfast treat with the pecans. I've made maple pecan scones in the past and thought about making them again but really wanted to try something new. I came across this recipe while reading a bunch of blogs.The recipe comes from Nigella Lawson. 

I was really excited for the outcome of these muffins. I love the combination of maple and pecan. I enjoyed the muffins; however, I thought they were a little too dry. Could be from over mixing the batter although I was really careful not to? Let me know if you have better luck!

Maple Pecan Muffins
Makes 12

1 cup pecans, roughly chopped
2 cups all-purpose flour
4 teaspoons baking powder
1/2 cup wheat germ
1 pinch of salt
1/2 cup milk
1 egg
1/2 cup maple syrup
1/2 cup vegetable oil
1 teaspoon vanilla extract
1 tablespoon dark brown sugar 

Preheat the oven to 400 degrees. Fill a 12-cup muffin tray with paper liners. Reserve 1/4th of the chopped pecans. Mix together the remaining pecans with flour, salt, wheat germ and baking powder. In another bowl, whisk together milk, egg, maple syrup, oil and vanilla.  Pour the liquids into the dry mixture. Gently fold to mix. The batter can have some lumps. Do not over mix because these muffins can get tough. Spoon batter into muffin cups.Chop the remaining nuts finely and mix with the brown sugar. Sprinkle a little of this mixture on top of each muffin.Bake for about 20 minutes until tester comes clean. The nut topping turns golden, but the muffins will be somewhat pale. Remove muffins to a cooling rack.

Sunday, December 12, 2010

Brown Butter Sage Sauce

I had intentions of making my own sweet potato gnocchi, butternut squash ravioli or pumpkin ravioli this year but for some reason I just didn't get to it. While I was grocery shopping yesterday, I noticed these yummy sweet potato gnocchi and thought to myself..."Thank you, Whole Foods!" It was a nice little shortcut and made dinner really simple and yummy! I've been wanting to make a brown butter sage sauce for a while. I did a quick Google search and found this great recipe from Giada. It pairs so nicely with winter squash and sweet/savory pastas like these gnocchi; however, I think it would go really well with any pasta. It would also make a nice sauce on roasted root vegetables...I'm think I'll be making that soon! Talk about a quick dinner!!
 
3/4 cup butter (1 1/2 sticks) 
2 tablespoons torn fresh sage leaves 
1/2 cup toasted walnuts, chopped 
1/4 teaspoon kosher salt, plus more to taste 
1/4 teaspoon freshly ground black pepper, plus more to taste 
1/3 cup grated Parmesan cheese
    Melt the butter in a large, heavy skillet over medium heat.
    Add the sage and walnuts and let cook until the butter starts to brown, about 3 minutes. Turn the heat off and season with salt, and pepper. Pour over gnocchi and sprinkle with Parmesan cheese.

    Thursday, December 9, 2010

    Nuts about Pecans!

    Yesterday when I got home from work I was greeted by a nice box on my porch! My good friend, Melissa (I've talked about her before), had a box of goodies waiting for me. Isn't she so sweet! Apparently, she knows someone who knows someone who owns a pecan farm somewhere in the south. Among the goodies on the porch, she left me lots of PECANS! She knows I'm nuts about pecans (funny, right?)!

    Any way, I have a lot of pecans in my kitchen now. I'm not exactly sure what I'm going to do with them all but I have some ideas! Pecans, like most nuts, are great because they're good savory and sweet! Look out for some pecan recipes coming your way! I'll be using some up this weekend!

    Thanks for the pecans, Melissa! You're awesome!! xoxo!

    Tuesday, December 7, 2010

    Gingerbread house

    1. Make a gingerbread house
    I've always wanted to make a gingerbread house. Every year I say that I want to and I never do...So this is the year

     I'm just checking things right off my December checklist...Aren't you just oh so proud of me?? On Saturday night the gingerbread house task was completed! My good friend from college, Leora, and her boyfriend, Seth, came over to help with the task. It was a lot of fun! I think I'll do it again next year!


     Send me pictures of your gingerbread house! I'll post them on the blog! 

    Friday, December 3, 2010

    Peppermint Bark

    I'm not a huge fan of white chocolate and I'm not a huge fan of peppermint...so you might be asking yourself... "why in the world did Lynn make peppermint bark?" Well I'll tell you why...1.) Remember I'm trying to make 10 different holiday goodies?? I can't only make cookies! 2.) It's very festive and 3.) because I wanted to. Those are good enough reasons, right?

    A lot of you probably have a holiday party to attend or you're throwing one yourself. Peppermint bark is a good snack to bring or serve! It can also make a great gift in a pretty little holiday tin! It's really easy and you can make as much or as little as you'd like.


    I chose this recipe from Joy of Baking since it also uses semi sweet chocolate along with white chocolate. I know I said I'm not a fan of white chocolate or peppermint but I actually ended up liking this! Try it, you'll like it!

    6 ounces (170 grams) semi sweet chocolate, coarsely chopped
    2 teaspoons vegetable oil
    6 ounces (170 grams) white chocolate, coarsely chopped
    1/3 - 1/2 cup (50 - 80 grams) crushed candy canes

    Line the bottom and sides of an 8 inch (20 cm) square baking pan with aluminum foil, smoothing out any wrinkles. Melt the semi sweet chocolate and 1 teaspoon of vegetable oil in a heatproof bowl placed over a saucepan of simmering water. Immediately pour the melted chocolate into the prepared pan and tilt the pan so the chocolate makes an even layer. Place in the refrigerator for about 30 minutes, or until the chocolate has set.
    Then, melt the white chocolate and remaining 1 teaspoon of vegetable oil in a heatproof bowl placed over a saucepan of simmering water. Immediately pour the melted white chocolate over the dark chocolate and tilt the pan so the chocolate is in an even layer. Sprinkle the crushed candy canes evenly over the white chocolate. Place in the refrigerator for about 30 minutes, or until the chocolate has set.
    Remove the Peppermint Bark from the pan by lifting the edges of the aluminum foil. Peel back the foil and break the bark into small irregular pieces. Store in an airtight container in the refrigerator for up to two weeks.
            

    Thursday, December 2, 2010

    Emeril's Three-Cheese Baked Macaroni

    I have had so many mac 'n cheese fails in my day (just ask Nadya!).  I'm always trying to make it 'healthy' which is why it doesn't turn out all that well...I guess it's just meant to be unhealthy. Many of the recipes I've tried didn't turn out too well but I'm always willing to try another. Emeril has a column in Everyday Food. This recipe comes from the September 2010 issue and let me tell you, this recipe is super easy, super tasty AND not too bad for the waste line! If you have a mac 'n cheese recipe you love, I would love to try it!

    Ingredients

    • Coarse salt
    • 1/2 pound elbow macaroni
    • 3 slices bacon, cut crosswise into 1/2-inch pieces ( I used turkey bacon)
    • 1 1/2 teaspoons minced garlic
    • 3 large eggs
    • 1 can (12 ounces) evaporated milk
    • 1/4 teaspoon cayenne pepper
    • 1/8 teaspoon ground nutmeg
    • 1 1/2 cups grated sharp cheddar (6 ounces)
    • 1/2 cup grated Monterey Jack cheese (2 ounces)
    • 1/2 cup finely grated Parmesan (1 ounce)

    Directions 

    Preheat oven to 475 degrees. In a large pot of boiling salted water, cook macaroni 6 minutes (it will be undercooked). Drain. Meanwhile, heat a small skillet over medium and add bacon. Cook until fat is rendered and bacon is crisp, about 10 minutes. Add garlic and cook until fragrant, 30 seconds. With a slotted spoon, transfer bacon mixture to a medium bowl. Add macaroni and stir to combine. 

    In a large bowl, whisk together eggs and evaporated milk. Add 1/2 teaspoon salt, cayenne, nutmeg, and cheeses; mix well. Add macaroni mixture and stir well to combine. Transfer to an 8- or 9-inch square baking dish or 2-quart gratin dish. With a spoon, gently spread mixture to form an even layer. Bake just until sauce is bubbling at edges, 12 minutes. Let rest 10 minutes before serving.

    December Wish(check)List!


    Can you believe it's December already? I truly can't! This year is quickly coming to an end but there is a lot I want to do before it does end. So to keep me on track I thought I'd make a nice list of things I want to do before 2011. If I blog about it...I have to do it, right?

    So here are some things I want to do to celebrate the season!

    1. Make a gingerbread house
    I've always wanted to make a gingerbread house. Every year I say that I want to and I never do...So this is the year!

    2. Bake at least 10 different types of goodies during the holiday season (and not eat all of them)  
    So many families, including my own, bake a lot around the holidays. I feel like I bake but not a lot and now that I have my kitchen completed I feel like this is the year of holiday baking for me! Within this 'task' I have a lot planned but I'll keep that a surprise! 

    3. Try Eggnog
    I'm thinking about making it...I don't know though I just get so scared with the idea of drinking raw eggs.  Call me crazy but I really want to like eggnog. In order to like it I have to try it.


    This list seems simple, doesn't it? My hardest task will be not eating all the baked goods! I'm excited to celebrate the holiday season. I'll keep you posted on the progress of my holiday checklist! 


    Enjoy your holiday season! xoxo

    Wednesday, December 1, 2010

    Thanksgiving Summary

    Please forgive me for the lack of pictures in this post. I was so busy getting everything ready and trying to get everyone fed that I totally forgot to take pictures of all the dishes! Silly me, right?? I was debating about doing a Thanksgiving post since I don't have pictures to show but decided to let you all know how everything turned out. So here's the details...

    Thanksgiving 2010 was at my parents house in good old Scranton, PA. There was a lot of work that needed to be done so my mom and I started early Wednesday morning and I don't think we sat until dinner on Thursday but it was well worth it.

    So here's the menu: (click each individual item for the recipe)

    Starter: 
    Main Meal

    We also made a sweet potato casserole, a corn dish casserole, & herbed monkey bread...Hopefully my mom will follow up with those recipes so I can share them with all of you!

    Hope you all had a great holiday! Let me know what your favorite dish was!

    Tuesday, November 30, 2010

    Baked French Toast

    The weekend before Thanksgiving was 'girls weekend in the mountains". We've talked about renting a house in the Poconos for a while but never did anything about it...until Melissa booked the trip for us! I'm so happy she did. It was a really great weekend. How could it be a bad weekend when basically all I did was drink wine all weekend.

    Over the weekend we all took turns making meals. I signed up for breakfast...OK that's a lie....Nadya signed me up for Sunday breakfast. She was really hoping I'd make a strata because she likes it so much. Well I pulled the wool over here eyes when I decided to make a french toast bake! Yep, that's right a french toast bake. I got the idea while reading one of my many magazines and then I came across this Paula Dean recipe! I think Paula recipes are only legal when you're on vacation...man does that woman like her butter! 

    The recipe didn't turn out how I thought it would. In my opinion, it was good but not great. You can find the recipe here

    Let me know if you have any french toast bake luck. I'm willing to try another recipe! 

    Hopefully we'll be going back to the Poconos in the Summer and hopefully Joelle & Gina (I guess) can join us next time! 

    Tuesday, November 16, 2010

    Buffalo Chicken Pizza


     I had some of this in the freezer and came up with......

    Buffalo Chicken Pizza!

    There's a pizza place near my house that makes a great buffalo chicken pizza; instead of ordering it in one night I decided to try it out at home. I'm happy I did because it actually came out pretty darn good and was really easy to do. 

    I'm a huge fan of hot, spicy foods which is probably why I enjoy this pizza so much. I believe this was one of those nights that I didn't have anything planned. So I started looking through the kitchen to see what I can mix up...I had chicken, pizza dough, hot sauce, and blue cheese. The stars were aligned! 

    You can make this pizza as spicy as you wish.  If you're not a fan of blue cheese, try Gorgonzola.  I always find the pizza dough bakes up nicely when I pre bake it. 

    Ingredients: 
    Pizza dough (see recipe here) 
    1 cup Hot sauce, plus 2 tablespoons butter
    1 lb grilled chicken breast, chopped
    1/2 cup blue cheese grumbles 

    Bake pizza dough for 12 minutes at 375. While pizza dough is baking, combine hot sauce and 2 tablespoons of butter in a small saucepan on medium heat.  (Add more hot sauce if you wish.) Layer chicken, hot sauce, and cheese. Bake for an additional 10 minutes.

    Thursday, November 11, 2010

    Butternut Squash Risotto

    Another thing about the fall that I love is butternut squash. There are so many things you can do with butternut squash. You can make ravioli, a butternut squash sauce for pasta, roasted butternut squash, soup...the list goes on and on. I decided to make risotto with it. Risotto can be your main meal or a side dish depending on how hungry you are.

    I feel like a lot of people are scared to make risotto. It's really nothing to be scared about.Once you get the process down you can be really creative with it and make all different types of risotto.

    This recipe comes from the one and only...Martha! 
    • 1 tablespoon butter
    • 1 1/2 pounds butternut squash, peeled, seeded, and cut into 1/2-inch chunks
    • Coarse salt and ground pepper
    • 1 cup Arborio rice
    • 1/2 cup dry white wine
    • 2 cans (14 1/2 ounces each) reduced-sodium chicken broth, mixed with 1/2 cup water and heated
    • 1/3 cup grated Parmesan cheese, plus more for garnish
    • 1 tablespoon chopped fresh sage, plus more for garnish
    1. In a medium heavy-bottom saucepan, melt butter over medium heat. Add squash; season with salt and pepper. Cook, stirring often, until edges soften, 6 to 8 minutes.
    2. Add rice; stir to coat. Add wine; cook until almost all liquid has evaporated, 1 to 2 minutes.
    3. Reduce heat to medium-low; add 1/2 cup hot broth mixture. Cook, stirring, until almost all liquid is absorbed. Add remaining broth mixture, 1/2 cup at a time, stirring until liquid is absorbed before adding more, 35 to 40 minutes total.
    4. Stir in Parmesan, sage, and 1 1/2 teaspoons salt. Serve immediately, garnished with more Parmesan and sage, if desired.

    Wednesday, November 10, 2010

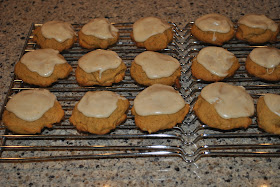
    Pumpkin Cookies...I promise you can't just have one!

    I warned you I was getting plenty of use out of that new mixer! (thanks again, mom & dad!) Here is one of the many sweets I made since I got the mixer. Let me just start off by telling you how much I love the fall! I'm sure you've heard it from me before but seriously, it's by far the best season out there. The flavors, the colors, the weather, the clothes....OK you get what I'm saying now back to the cookies. 

    These cookies are more like pumpkin cake bites. I've made pumpkin cookies before, yep even blogged about them, but these aren't even comparable to them. I promise if you like pumpkin you'll love these cookies!
    I used the following recipe for the cookies but used whole wheat flour instead of all purpose. I used Martha's brown butter icing recipe which is a perfect match for these cookies! 

    For the Cookies: 
    Ingredients:   
    1 cup unsalted butter
    1 cup sugar
    1 cup cooked, pureed pumpkin (fresh or canned)
    1 egg
    1 teaspoon pure vanilla extract
    2 cups unbleached all purpose flour ( I used 1 cup all purpose / 1 cup whole wheat)
    1 teaspoon baking powder
    1/2 teaspoon baking soda
    1/2 teaspoon salt
    1 teaspoon cinnamon
    1/2 teaspoon freshly grated nutmeg 

    Directions:
    Preheat oven to 350 degrees. Cream butter and sugar until fluffy. Add pumpkin, egg and vanilla and mix well. Combine flour, baking powder, baking soda, salt, cinnamon and nutmeg. Stir into butter mixture until well blended. Drop by teaspoonful onto parchment covered baking sheet, about 2 inches apart. Bake about 15 minutes, or until golden. Cool. 

    For the Icing:  
    ( I cut the recipe in half. This amount is enough for 6 dozen)
    Ingredients:
    4 cups confectioners' sugar, sifted 
    10 tablespoons (1 1/4 sticks) unsalted butter 
    1/4 cup plus 1 tablespoon evaporated milk
    2 teaspoons pure vanilla extract

    Directions:
    Put confectioners' sugar in a large bowl; set aside. Melt butter in a small saucepan over medium heat. Cook, swirling pan occasionally, until golden brown, about 3 minutes. Immediately add butter to confectioners' sugar, scraping any browned bits from sides and bottom of pan. Add evaporated milk and vanilla; stir until smooth. Spread about 1 teaspoon icing onto each cookie. If icing stiffens, stir in more evaporated milk, a little at a time.


    THANK YOU, Mame & Bill!

    That's right, Mame and Bill (my parents)  spoiled me with this beautiful KitchenAid Stand Mixer! I've always wanted one...even saved up for one! Now I can use my saved up money for attachments for this puppy! I got plenty of use out of it already and I'm so excited to see what else I'll make with it! 

    Thanks again, Mom & Dad! 
    xoxo!

    It's DONE...that's right it's DONE!!!

    ...and it was well worth it! I never thought that additional counter space, new cabinets, etc would make me as happy as I am! I truly love spending time in the new kitchen! Seriously, I spend ALL my time in there! Hopefully, the kitchen renovation will help me keep up on the blog more often! Let's keep our fingers crossed!

    If you want to see it in person (the pictures don't do it justice) please come over! I'll cook up a meal for you! Consider this your invitation!!!

    Sunday, August 1, 2010

    Spinach and Meatball Calzone

    Call me nuts but I've been craving slightly cooler weather. Mostly because a lot of my favorite meals go really well with cooler temperatures. I've been craving sauce and meatballs and thought this recipe would work perfectly as I stumbled upon it while re-reading the May 2010 issue of Everyday Food. I had whole wheat pizza dough in the freezer. Just had to make some turkey meatballs. Overall, this meal was pretty simple.
    The recipe suggests using sausage meatballs. I used my standard turkey meatball recipe but any would work just fine.  I'm keeping this recipe in mind when I have plenty of leftover meatballs! It's a great way to get several meals out of one main dish!

    • Extra-virgin olive oil, for baking sheet and brushing
    • 10 ounces baby spinach
    • Coarse salt and ground pepper
    • All-purpose flour, for work surface
    • 1 pound store-bought pizza dough (thawed if frozen), cut into 4 equal pieces
    • 8 meatballs, halved, and 1 1/2 cups sauce
    • 8 ounces fresh mozzarella, torn into pieces
    • 1/2 teaspoon red-pepper flakes (optional)
    1. Preheat oven to 450 degrees. Lightly oil a rimmed baking sheet. In a large saucepan, bring 1/2 cup water to a simmer. Add spinach and season with salt; cover and cook until wilted, about 2 minutes. Transfer spinach to a fine-mesh sieve and drain, pressing with a rubber spatula to release as much liquid as possible. Transfer spinach to a cutting board and roughly chop.
    2. On a lightly floured work surface, roll each piece of dough into an 8-inch round. In a medium bowl, stir together spinach, reserved meatballs and sauce, cheese, and red-pepper flakes (if using). Season with salt and pepper. With a slotted spoon, divide mixture among bottom halves of dough rounds, leaving a 1-inch border. Fold top half of each round over filling and roll and pinch edges to seal. Carefully transfer calzones to baking sheet. Brush tops lightly with oil and season with salt and pepper. Bake until calzones are golden brown, 15 to 18 minutes.

    Friday, July 30, 2010

    Ch Ch Changes...

    I'm sure you're aware if you're reading this...but I made some changes to Lots to Ladle. Blogger has been making plenty of tweaks and I'm very happy about most of them! They actually made it a lot easier to upload videos so maybe I'll incoporate some videos from the kitchen? Maybe...just maybe??  Now back to the current changes: 

    1. There's a new look! What do you think?
    2. There's a 'search box' in the upper right corner to help you search for what you're looking for on Lots to Ladle
    3.  At the end of every post there are share buttons, which make it really easy to email, tweet, and/or blog anything you'd like to share!  

    I hope these changes make your experience on Lots to Ladle a lot more enjoyable!

    xoxo,
    Lynn

    Wednesday, July 28, 2010

    A note from me to you!

    OK so here's the deal my lovely Lots to Ladle readers (again, all 3 of you), there's actually a lot going on. (After this post I'll be able to see how many of you there are; I hope you respond or else goodbye lots to ladle...I'm kidding but I would like to hear from you!)

    First, I'd like to apologize for my lack in posts recently. I know many of you wake up every day, turn on your computer, check my blog, and curse me out for my lack of posting. Well I can explain, my camera broke! I've been cooking and baking a lot actually, just haven't been documenting my meals. Rick Peil...oh I mean Nadya isn't always around or is just too hungry to 'waste time and take pictures'. Trust me I have tried to use the SLR a time or two but I'm just not that good at it. So forgive me for any bad pictures, more likely than not I took them!

    OK moving on...Now here's the news I'm excited about....I'm renovating my kitchen! Yes, this means more counter space, more cooking, more baking, and more blogging! If everything goes as planned, things should get started in 2 weeks (fingers crossed). I'll keep you posted on the whole process!

    Here's where YOU come in. Yes, you!  While my kitchen is under construction, it will be hard for me to be creative in the kitchen. So I'm looking for some guest bloggers. Yep, that's right, you heard me...guest bloggers! Who's in?? Comment on this post and let me know if you're interested in guest blogging and I'll make the arrangements! I look forward to hearing from you!

    xoxo,
    Lynn

    Tuesday, July 27, 2010

    Summer Tea Series: Part 2 Arnold Palmer

     Yet again, another edition of the Summer Tea Series! How exciting? I searched high and low for a good recipe for one of my favorite drinks, Arnold Palmer, and I hate to say it but this recipe isn't 'the one'. Maybe I'll try out another recipe and do a post called 'Part 2 of Part 2'? Just a thought...

    Anyway, back to the drink. Some call this drink 'half and half' because it's half lemonade and half iced tea. I call it an Arnold Palmer, named after the famous golfer (although I really don't get the connection, anyone?).

    I'm a big fan of my iced tea so that part of the drink was perfect but the lemonade portion of the drink was just 'so so'. It was a little too pulpy for me even after spending some time in the blender. I like the concept of scooping the frozen lemonade into the iced tea but I think I'd rather have it all mixed together prior to pouring it into my glass.

    The Tyler Florence recipe can be found here. Maybe you'll have better luck. I'll report back on my second attempt! 

    Arugula Salad with Almonds and Parmesan


    I don't know if I mentioned this before or not BUT arugula is one of my favorite greens. I came across this recipe while reading a recent edition of  Everyday Food. This simple salad is perfect for a light meal or a great start to a larger meal. Although there's not much in this salad, it still has so much flavor and is actually quite filling! Grilled Chicken would be a great addition.

     YUM!!
    Ingredients
    1/3 cup toasted natural almonds
    3 tablespoons extra-virgin olive oil
    2 teaspoons fresh lemon juice
    2 teaspoons balsamic vinegar
    Coarse salt and ground pepper
    1 bunch arugula (1/2 pound), trimmed
    1/3 cup shaved Parmesan (1 ounce), plus more for serving

    In a large bowl, combine almonds, oil, lemon juice, and vinegar; season with salt and pepper. Add arugula and Parmesan and toss to coat. Serve topped with more Parmesan.

    Wednesday, June 30, 2010

    It's about time I give 'pizza dough' it's own post

    I realized the other night as I was making my standard pizza dough that I have blogged a lot about pizza but never gave credit to the dough itself. How foolish of me, right? 

    I used this recipe all the time. I love keeping pizza dough in the freezer as I often find myself using it if I'm in need for a quick dinner or when I have nothing planned (yes, sometimes that happens).

    There are many recipes out there but I'm running on this motto "if it ain't broke, why fix it?" So I'll be sticking with this pizza dough unless you can convince me otherwise.

    Of course this great recipe comes from Martha! Did I mention it's whole wheat? Must mean it's better for you, right?

    Ingredients:
    1 1/2 cups warm (115 degrees) water
    2 packets ( ounce each) active dry yeast
    1/4 cup olive oil, plus more for bowl
    2 tablespoons sugar
    2 teaspoons coarse salt
    2 cups all-purpose flour (spooned and leveled), plus more for kneading
    2 cups whole-wheat flour (spooned and leveled)

    Directions
    1.Place water in a large bowl; sprinkle with yeast. Let stand until foamy, about 5 minutes. Brush another large bowl with oil.

    2.In bowl with yeast, whisk sugar, oil, and salt. Stir in flours with a wooden spoon until a sticky dough forms. Transfer to oiled bowl; brush top of dough with oil. Cover bowl with plastic wrap; let stand in a warm spot until dough has doubled in size, about 1 hour.

    3.Turn dough out onto a well-floured surface. With floured hands, knead until smooth, about 15 seconds; divide into two balls.

    4.Set balls on a plate (they should not touch); freeze until firm, about 1 hour. Then freeze in a freezer bag up to 3 months. Thaw overnight in refrigerator.

    5.Divide each ball of dough into 4 pieces. Using your hands, stretch each piece into a 5-inch disk (if dough becomes too elastic to work with, let it rest a few minutes). Freeze shells on two parchment-lined baking sheets. Stack frozen shells between layers of parchment paper. Freeze in a freezer bag up to 3 months. Bake from frozen.

    Summer Tea Series: Part 1 Classic black iced tea


    Here it is...the first installment of the Summer Tea Series. I know, I know it's super exciting. I decided to start off with classic black tea for the first edition (after all, it's classic). Unsweetened iced tea is really easy to make and great to have on hand. It's a lot healthier than any soda and a lot tastier than water.Keep in mind, this recipe can work with any flavor tea bag. The lovely pitcher I have (courtesy of Mame) holds 10 cups so you may have to adjust the amount of tea based on the size of your pitcher.

    Ingredients:
    5 tea bags (decaffeinated black tea)
    10 cups water
    lemon juice from 1/2 lemon
    1/2 cup of sugar ( you can add more or less depending on your liking)

    Directions:
    Bring 10 cups of water to a boil in a large pot. Once there's a steady boil, remove from heat and place tea bags in hot water. Let the water (tea) get to room temperature. Remove tea bags once tea is at room temperature. Add lemon juice and sugar. Transfer to pitcher and you're ready to serve.

    Sunday, June 6, 2010

    Chicken Tostada Salad

    This recipe comes from the May 2010 issue of Everyday Food.  I made this meal around Cinco de Mayo ( I know, I know! I'm sorry I'm just posting it now). Tostada is exactly what it sounds like, a toasted tortilla. The tostada serves as the crunchy shell to this very simple salad. This was a very tasty and simple meal to prepare. Next time I'll make a lime vinaigrette to go with the salad. I didn't think there was enough flavor from the lime juice alone. It was a bit too dry.
    Ingredients: 
    4 corn tortillas
    3 tablespoons of olive oil
    3/4 cup grated Monterey Jack cheese
    1/2 small red onion, diced
    1/2 teaspoon chili powder
    1 garlic clove, minced
    breast meat from 1 rotisserie chicken, torn into bite-sized pieces
    coarse salt and ground pepper
    1 tablespoon plus 1 teaspoon fresh lime juice
    1/2 head romaine lettuce
    1 tomato, seeded and chopped
    1 avocado, halved, pitted, peeled, and diced
    fresh cilantro

    1. Preheat oven to 400. Brush each side of the tortillas with olive oil. Bake for 10 minutes. Divide cheese among tortillas and return to oven until cheese is bubbling, about 3 minutes. 

    2. In a large skillet, heat 1 tablespoon of olive oil over medium high. Add half the red onion and cook until softened. Add chili powder and garlic and cook until fragrant, 30 seconds. Add chicken and 1/4 cup of water and season with salt and pepper. Cook for 2  minutes. Stir in 1 teaspoon lime juice and remove from heat. 

    3. In a large bowl combine lettuce and 1 tablespoon lime juice; season with salt and pepper. Toss well to coat and divide among tortillas. Top each with chicken mixture, tomato, avocado, remaining onion, and cilantro.